Page 2 of 3
Re: Custom Sterly
Posted: Wed May 31, 2017 3:14 pm
by OH Osthaus
It's backwards for a reason It would seem that heading up the stock first gives you the best way to define the final dimensions more accurately
Re: Custom Sterly
Posted: Thu Jun 22, 2017 7:51 pm
by yavapaigunworks
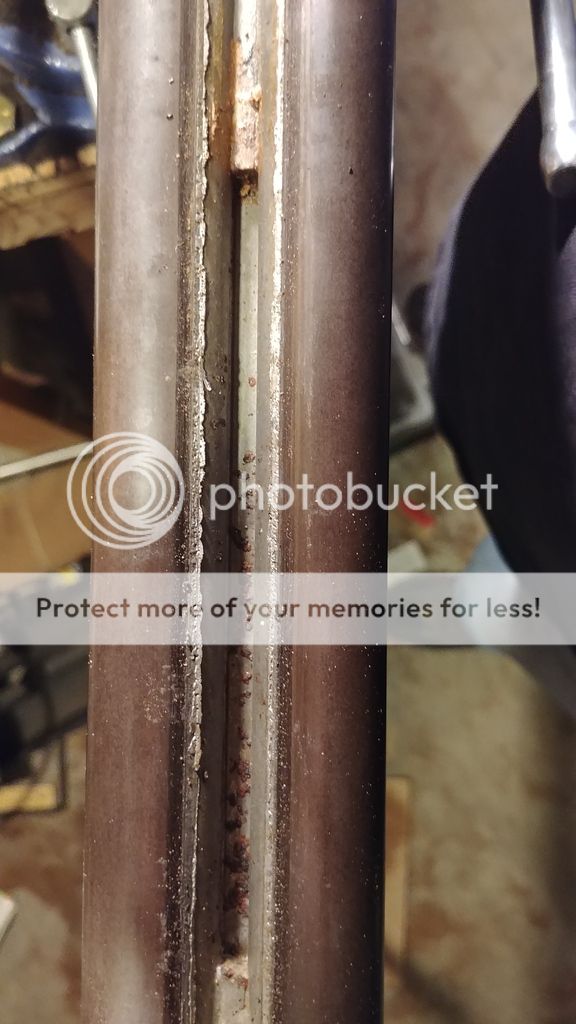
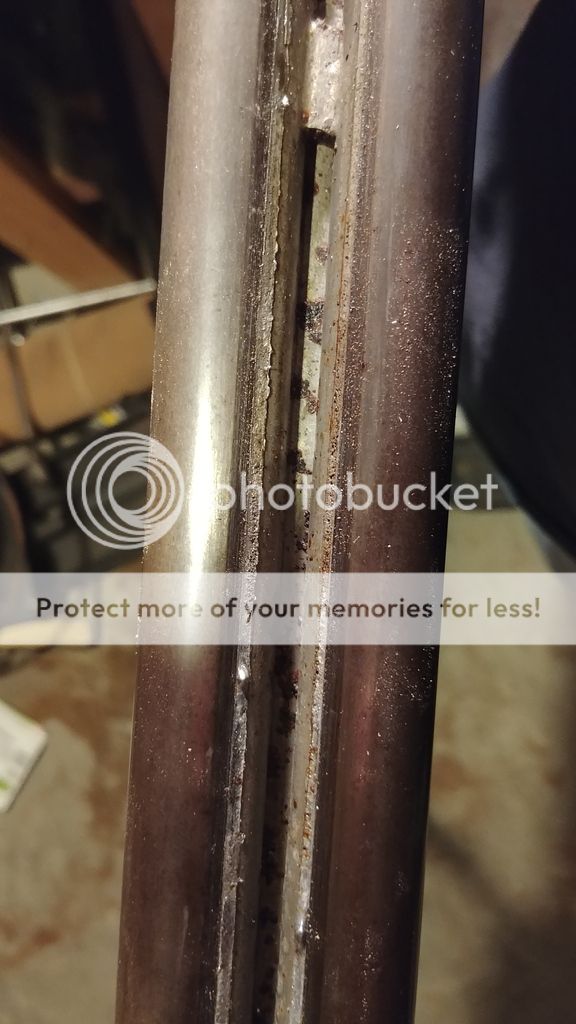
Well, since the gun is out being engraved, I figured I would start on the barrels today. Part of the top rib had separated, so off it comes!

apce
All in all the space between the ribs doesn't look too terrible. The first pic is just a bunch of junk/flux sitting there. It wipes right out.


Now to clean it all and get to work relaying the rib. I still need to pull the bead out of the rib so I can drill and tap for the white bead I have.
Re: Custom Sterly
Posted: Fri Jun 23, 2017 7:49 am
by vaturkey
Thanks for posting. Always fun to follow these DIY posts.
Re: Custom Sterly
Posted: Fri Jun 23, 2017 9:30 am
by bbman3
Great pictures and wood,your bench looks a lot like mine! Bobby
Re: Custom Sterly
Posted: Fri Jun 23, 2017 3:57 pm
by yavapaigunworks
bbman3 wrote:Great pictures and wood,your bench looks a lot like mine! Bobby
If by "looks like mine" you mean cluttered and not sure how you can find or do anything on it, I bet we're not alone!
I have the barrels cleaned up enough to resolder the rib on. However, when I went to heat up the rib again to remove the tapered/soldered sight bead, I ended up slightly bending the front of the rib a touch. I straightened it, but you can tell there's a wave on the sides. It's slight, but it's there. I laid the rib on the barrels and I don't think anyone will be able to tell without REALLY looking for it. Too bad I know its there. Good thing this in my own gun and not someone elses. I did finally get the old bead out and drilled/tapped it for a 4-40 screw, and now the white bead sits nicely on it. Does anyone have a line on someone who can re-mat the rib on these guns after I solder it back together, or before it goes together even? The matting is light and once I go to polish and reblue the barrels, I'm afraid I'm going to lose most if not all of it.
Re: Custom Sterly
Posted: Fri Jun 23, 2017 4:11 pm
by vaturkey
yavapaigunworks wrote:bbman3 wrote:Great pictures and wood,your bench looks a lot like mine! Bobby
If by "looks like mine" you mean cluttered and not sure how you can find or do anything on it, I bet we're not alone!
I have the barrels cleaned up enough to resolder the rib on. However, when I went to heat up the rib again to remove the tapered/soldered sight bead, I ended up slightly bending the front of the rib a touch. I straightened it, but you can tell there's a wave on the sides. It's slight, but it's there. I laid the rib on the barrels and I don't think anyone will be able to tell without REALLY looking for it. Too bad I know its there. Good thing this in my own gun and not someone elses. I did finally get the old bead out and drilled/tapped it for a 4-40 screw, and now the white bead sits nicely on it. Does anyone have a line on someone who can re-mat the rib on these guns after I solder it back together, or before it goes together even? The matting is light and once I go to polish and reblue the barrels, I'm afraid I'm going to lose most if not all of it.
Jon Hosford has the original Fox Rib matting machine. He can quote you a price on rematting the rib.
https://www.hosfordco.com/history/
Re: Custom Sterly
Posted: Wed Jul 05, 2017 2:33 pm
by yavapaigunworks
Well, relaying shotgun ribs is frustrating to say the least. This being my first time and all, I knew I would run into issues. I thought I had finally got it. When I was finishing up the muzzle end, the lower rib popped and the ends of the barrels shifted. I hope that was the only point. Once it cools off, I'll be able to assess it better.
Re: Custom Sterly
Posted: Wed Jul 05, 2017 5:46 pm
by yavapaigunworks
Looks like I spoke too soon. I looked at it all, and it was only the front bit of the lower rib that separated. With the help of some spring clamps, iron wire, and a nail, I was able to bring it all back together. Hanging it from the hook, the barrels ring real nice now. I'll post before cleanup and after cleanup pics later. In just happy I was able to get it all back together
Re: Custom Sterly
Posted: Thu Jul 06, 2017 9:13 am
by Silvers
Sounds like a good learning experience. Did you maintain heat full length on the barrels during soldering? What solder and flux were used?
Re: Custom Sterly
Posted: Thu Jul 06, 2017 12:43 pm
by yavapaigunworks
No, I did not keep heat on the full length of the barrels. I used a propane torch with a flame spreader so as to heat the area I was working on as evenly on both sides of the rib as possible. I used 50/50 lead/tin solder and nokorode regular paste flux. It was a learning experience for sure. I need to find some junk soft soldered barrels to keep practicing with. In school, our section on double guns is very short and we don't really get into them at all, so its all trial and error for me. Hopefully the lessons I learn will hang out longer that way
Re: Custom Sterly
Posted: Thu Jul 06, 2017 2:33 pm
by Silvers
Hopefully there's a means by which you can provide helpful feedback to your school administration regarding the high demand for good double gunsmiths and, in turn, that may lead to an expanded curriculum and with more qualified instructors on the faculty.
Back in the day, ribs were soldered while heating the barrels full length and laying on a rack over a long gas burner, they'd been previously tinned and wired together. Alternately the barrels were preheated full length with heavy copper rods that were near bore diameter and at 400-degrees or so before insertion in the bore. Then the torch was only used sparingly to bring the section being soldered up to melt temp. Rosin was generally used as a flux although some makers apparently used an acid flux. The active ingredient in Nokorode paste is zinc chloride which is mildly acidic.
Re: Custom Sterly
Posted: Thu Jul 06, 2017 2:56 pm
by yavapaigunworks
Good to know. I didnt know how they were originally soldered. Seems like it would be simple enough to build an apparatus to do it that way now.
I believe that the school is looking at the gun industry as a whole when it sets up its curriculum. While there is a need for quality double gun smiths, with how few manufacturers there are for quality doubles and how much they tend to cost, most are willing to send their guns back to the manufacturer for repair rather than run it down to their local gunsmith. Those of us who enjoy classic double guns that are no longer being made are left with those few gun smiths who have been working on them for decades. I hope once I'm done with this course I get the opportunity to study under someone who knows these quickly disappearing skills. Building high end bolt actions and custom 1911's is fine, but I would rather add double gun work to my repertoire and focus there.
Re: Custom Sterly
Posted: Thu Sep 28, 2017 1:57 am
by yavapaigunworks
I got my gun back from the engraver a couple of days ago and just sent it out to Classic Guns to be color case hardened. Here's a few pictures:
Re: Custom Sterly
Posted: Thu Sep 28, 2017 6:35 am
by vaturkey
Thanks for posting. Following this to see what the in product is. Agree with others in that this is a wonderful learning experience.
Re: Custom Sterly
Posted: Thu Sep 28, 2017 9:07 am
by SPE33
Very pretty,looking forward to seeing the gun when it's all finished and back together.You have picked some talented people to do the work for you.
 apce
apce 


